In this guide, we’re going to share the strategies and tactics we use to help our clients set up and run top-performing Google Shopping campaigns. We’ve previously written case studies and strategy articles (which we link to below) around Google Shopping, but in this piece, we’re diving into campaign setup and execution and linking to our other resources for readers looking for more detail on any particular topic.
Google Shopping consists of two platforms—Google Ads (formerly Google AdWords) and Google Merchant Center. Google Merchant Center is where your product data feed lives and Google Ads is where you can build and optimize your campaigns, set your budget and adjust your bid strategy.
Here’s what we’ll cover to teach you the nuts and bolts of setting up, optimizing, and executing your Google Shopping ads campaigns:
- Create Your Google Shopping Campaign
- Optimizing Your Google Shopping Campaign
- Set Up Product Groups
- Use Negative Keywords and Campaign Priority Settings to Increase Conversions
- Analyze Google Shopping Campaign Data Regularly
Who We Are: At Inflow, we work with dozens of eCommerce companies to increase traffic, conversions, and sales. You can talk to one of our Google Ads specialists to see how we can help you increase ROAS. Get started now.
What Are Google Shopping Ads
Google Shopping campaigns—also known as Product Listing Ads (PLAs)—are somewhat of a hybrid between dynamic search and dynamic remarketing ads. You upload your product feed to Google and then Google automatically displays your product ads based on searches it deems relevant. You might think this is bad since you aren’t creating the ads and bidding on keywords. However, if you are doing the work of optimizing your data feed frequently, this can work in your favor as you are showing up for only the most relevant searches at a fraction of the cost of PPC search ads.
In fact, Google Shopping campaigns drive 76.4% of all retail search ad spend, and contribute to 85% of all clicks.
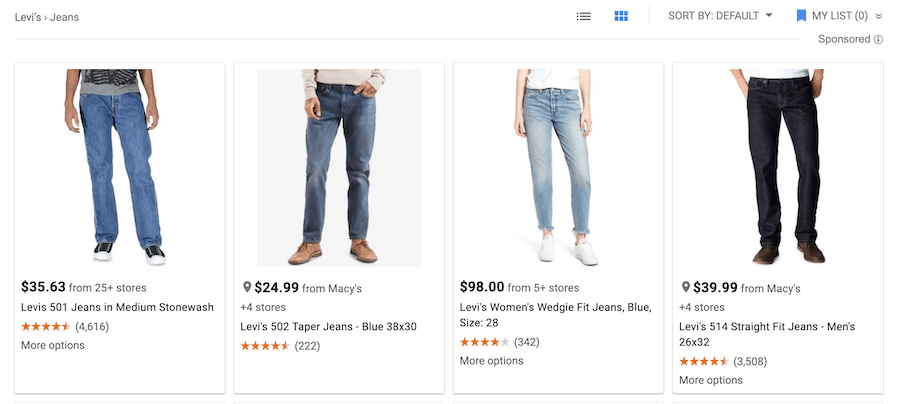
Say your online store sells Levi’s blue jeans. While there is nothing wrong with this text ad per se, it does lack most of the purchasing triggers like high-quality product images, product descriptions, and customer reviews.

Whereas with Google Shopping ads, it looks and feels like you are on an eCommerce listing page already. You have all the info: images, price, review ratings, details, size information, etc.
So you can browse and find the one you want instead of two text ads offering little information. In addition, the ad takes you directly to the product you see as well, instead of a more generic landing page. So, you send traffic further down the funnel and decrease the amount of clicks to final purchase.

Speaking of relevant, when you take the time to optimize your data feed, you can make sure you show up for the long-tail keywords that are the most likely to lead to a sale (such as Levi’s men’s black jeans, size 38) and deliver a shopping ad that specifically takes traffic to a jeans product page with that size and color.
Creating Your Google Shopping Campaign
Choose Your New Campaign Goal
The first step is choosing your goal or objective such as:
- Sales
- If you are first starting out, we’d recommend choosing this goal. If you want to change it later on, it’s easy to adjust.
- Leads (and showcase shopping ads)
- Website Traffic
- No goal
After selecting “Sales” you can then proceed to “Shopping,” choose your merchant center, and finally select the “Standard Shopping” campaign option to proceed. The next part of the campaign setup includes items like geo targets, budget, bidding strategy, campaign priority and device specific bid adjustments. (We’ll cover these shortly.)
Set Up Your Ad and Product Groups
You will now be able to create ad groups and product groups. This should be influenced by your business, product performance, as well as your data feed. One quick way to start is to create multiple ad groups, each of which covers a category of products.
For instance, shoes vs pants vs shirts etc. Make sure to pull out the appropriate category and exclude the rest. To make sure you have your bases covered, we recommend having a very low bid, catch-all ad group as well (in case you forget to pull out a specific category).
You’ll want to adjust this approach as you collect data, incorporate more insights and take advantage of custom labels for attributes such as product margins, seasonality, sales, etc.
Pro Tip: If you want to brainstorm additional campaigns, ad groups, or product group structures, check out this article.
Bidding
While automated bidding can be effective as you can set it to either maximize clicks, enhance CPC, or target ROAS, it can also lead to some wasteful spending if not managed properly. You also need to reach a minimum conversion threshold to use many of the automated strategies. It’s usually best to start with manual bidding until you have a better idea of how the products will perform (conversions, conversion rate, ROAS levels). Then based on performance, you can test out automated bidding more selectively.
In addition to starting with manual bids, it’s a good idea to review the “Products” report for your campaign regularly. Filtering products with low or zero impressions can help you identify opportunities to bid higher on products with little data. You can also filter based on product status (in case products are getting little-to-no impressions due to warnings or disapprovals), which you’ll need to fix in Merchant Center.
You can also build campaigns that specifically target seasonal products (for example, snow blowers) and implement geographic bid modifiers for regions where your products are more relevant such as in North Dakota and Minnesota. By doing so, you can maximize your exposure in those regions while maintaining a more cost-effective bid in other regions (or removing them entirely).
You can also do this with device bid modifiers, as they tend to perform at different levels. In general, while you can use bid modifiers to increase or decrease bids, you can also use them to remove a device/region/audience entirely, particularly if you have to be budget conscious.
Pro Tip: Before you start running any campaigns, make sure your ad account is properly linked to Google Analytics and you have set up eCommerce conversion tracking.
In addition, it can be easy to get carried away with all the segmentation, which we’re typically fans of! The big thing to keep in mind, however, is that granularity should be dictated by volume of data as well.
For instance, if a product category is getting few impressions (5000/month), it probably doesn’t make sense to group this one in its own campaign, which has multiple campaigns based on regions and device types. That’s overkill, unless you have all the hours in the day to manage it 😉
Set Up Promotions
One way to increase conversions is to run promotions. There are four types of promotions you can run for specific products including:
- Offering a monetary discount (ex: $10 off)
- Offering a percentage discount (ex: 10% off)
- Including a free gift with purchase (ex: Buy one pair of jeans and get a free pair of socks)
- Free shipping
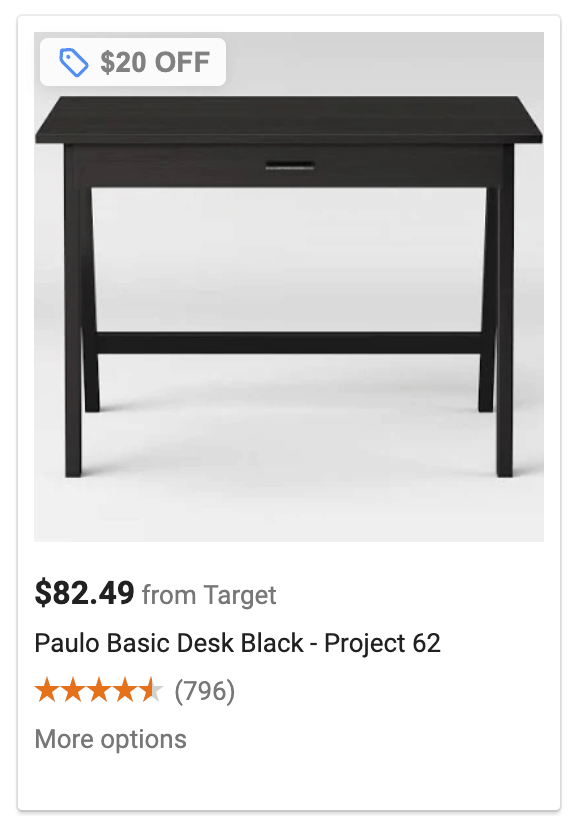
For example, say you sell wooden desks, you could offer $20 off to anyone who sees your ad on Google.

Enable Product Ratings
Another tip for increasing sales is to enable product ratings, which allows customers to rank your products from 1 to 5 stars.
To enable product ratings, you need to apply within your Google Merchant Center account. This feature is open to anyone with 50 or more customer reviews. In your application process, you’ll have to upload your review feed or link to one of the many third-party review aggregators.
Smart Shopping Campaigns
Smart Shopping campaigns are fully automated campaigns powered by Google AI and machine learning algorithms. You set your desired goal target ROAS (so be sure to group products that perform at similar ROAS levels in these campaigns) and then Google automagically surfaces the most relevant products to potential customers across search, display, YouTube and Gmail.
While these campaigns may save you a ton of time, we wouldn’t recommend throwing your entire product catalog and ad campaigns to Google AI.
For one, Google optimizes for transaction history. If your eCommerce store doesn’t have a lot of data, this can lead to subpar optimizations. In general, you have little-to-no control outside of choosing the products and setting the ROAS target. You can’t add negative keywords. You can’t create product-specific bids in case you’re more concerned with outranking a competitor. You can’t add any bid modifier for device type, etc.
Perhaps the most frustrating thing is, you can’t really do too much analysis either, no search queries or network placements to determine what specifically is working. All that said, it’s still worth testing.
It is for these reasons that we recommend starting small with only one ad group, letting it run for at least 15 days and then analyzing the results.
Set Up Remarketing for Your Google Shopping Campaigns
Another way to increase sales is through remarketing. There are two types of remarketing campaigns — Dynamic Remarketing and Remarketing Lists for Search/Shopping Ads.
- Dynamic Remarketing is display ads that follow shoppers across the web on the Google Display Network. These ads also create dynamic image sets of products people have viewed or added to cart (i.e. YouTube Ads and Google Display Ads).
- RLSA—Remarketing Lists for Search/Shopping Ads—to use this targeting, you build audience lists either via Google Ads or Google Analytics based on pages someone visited on your site, time on site, specific goals you create, sources of traffic, etc. Most segments you create in Google Analytics to do analysis can be turned into an audience. Once you build this audience, you can attach it to either a Search or Shopping campaign and add a corresponding bid modifier (or leave it in observation mode just to collect data). From here, if someone meets the criteria of your audience list AND searches for one of your targeted keywords (or product), you can decide to bid more aggressively on them, or you can even create a search campaign that only targets this audience and deliver custom messaging.
When you see how effective remarketing ads can be, it can be tempting to go all-in. However, we recommend paying attention to ad frequency (particularly for dynamic remarketing in the display network) as ad fatigue is a real problem. You could end up turning off potential customers. For example, Monday.com use of YouTube ads are a great example of remarketing overkill.
Follow the Google Merchant Center Guidelines
Google Merchant Center has a ton of guidelines and not all of them are obvious. Some of the biggest mistakes we see our clients make are:
- Not having a returns and refunds policy on their site (or hiding it).
- Promoting pre-orders or products that are out of stock (Note: This is why optimizing your data feed regularly is so important.).
- Data mismatches between the product feed (Google Shopping Feed) and the website. For instance, the price may not match, or the image may not be correct. A dynamic feed solution can help deal with this stuff before it becomes a problem.
Optimizing Your Google Shopping Campaign
To increase sales, make sure your campaigns are set up effectively. There are several tactics you can use with product groups, priority settings, and negative keywords.
Set Up Product Groups to Increase Sales
Instead of manually building ads and bidding on keywords as you have with text ads, with Google Shopping campaigns, you have product groups.
You can then divide your products into groups based on 8 categories:
- Item ID
- Brand
- Category
- Product Type
- Custom Labels
- Condition
- Channel
- Channel Exclusivity
If you are not sure where to start, structure your ad/product groups by product type. This gives you more flexibility to optimize your campaigns and adjust your bidding strategy.
How you structure campaigns should be catered to your eCommerce business’s objectives, seasonality, margins, etc. For example, if you have product-specific margins, then you can create a custom label that tells you what your margin (percent or dollar value) is for each product, and group products into those tiers so you can optimize towards profitability. If you have a blanket margin, then you can be a little more flexible with your setup.
Use Negative Keywords and Campaign Priority Settings to Increase Conversions
An additional way to increase sales is through negative keyword lists and adjusting your campaign priority settings.
Campaign Priority Settings
There are three levels for any campaign—high, medium and low. Google will serve the campaign with the highest priority.
Negative Keywords
Campaign/Ad Group negative keywords will prevent your products from appearing in certain Google searches for that campaign or ad group. These can be exact, phrase, or broad match.
- Exact Match– only the exact keyword you select will be excluded. If a search query contains more terms before or after keyword you select, it will not be excluded.
- Phrase Match– only the exact keyword you select will be excluded in addition to the search terms that contain your keyword in that exact order with any terms that precede or follow your keyword.
- Broad Match– as long as every word in your negative keyword can be found in the search term, in ANY order, it will be excluded.
We recommend updating your negative keyword list at least once a week. Some good negative keywords to include are any search terms with low buyer intent.
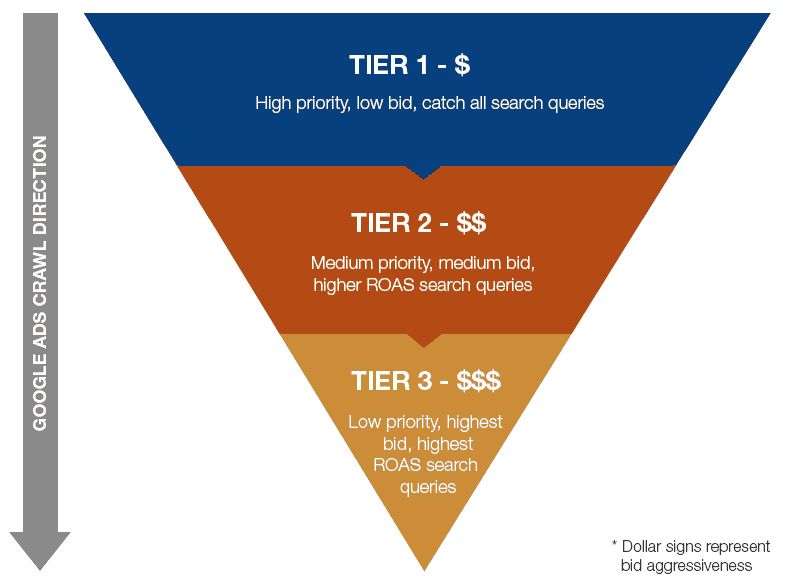
A more advanced tactic is using a tiered strategy. Say you have an eCommerce store selling Men’s Levi’s Boss Jeans, you can use a tiered strategy using campaign priority settings and negative keywords to bid higher on specific long-tail search queries and lower on more generic ones.
So if you know that when someone searches for “jeans,” they convert at a low rate, but after performing analysis, you find that when the search term contains “Levi” in addition to “jeans” it performs at a higher ROAS, and when it also contains the term “Boss” on top of the brand name, it does even better, then you have the opportunity for 3 campaign tiers.
- The first campaign (tier 1) will be high priority and low bid—intended to capture general search terms with relevant keywords. You can use negative keywords to remove brand and style terms.
- The second campaign (tier 2) will be medium priority and medium bid—and will catch all brand and style terms to start with. However, you will want to use negative keywords to remove style/model terms (like “boss”) so that this tier will only capture brand terms without the style modifier.
- The third campaign (tier 3) will be low priority and highest bid—intended to catch whatever you negated from the prior tiers, including the combination of brand + style terms.
Once you secure the proper negatives in place, then you can focus on tiers. However, be careful when you optimize. There is always the possibility that you bid too low in tier one and general terms go to tier 2, which you’re bidding more aggressively on.
Also, if you exclude a product in tier 1 but not the other tiers, that product’s general terms will go to the other (higher bid) tiers. So you have to make sure your campaigns are set up with the same products and that you keep a close eye on them.

Analyze Google Shopping Campaign Ad Data Regularly
It is always important to review your ad data on a regular basis. There are several segments you can review in Google Ads, and there’s endless performance data you can review using Google Analytics.
Google Ads can help you understand traffic potential (search impression share), competition (auction insights) and so much more. Google Analytics is excellent for reviewing other engagement metrics, attribution (how does your channel play with all the others?), etc. You should use your findings to:
- Update Negative Keywords regularly
- Analyze conversion rates by product group (such as by product id, product category or product type)
- Perform geographic and device analysis
- After collecting enough data, test bidding strategies including dayparting.
This will help you steadily increase ad performance over time.
Conclusion
In summary, these are some ways to improve Google Shopping ads performance, lower cost per click, and generate more sales for your online business.
Note: You can talk to one of our Google Shopping experts about how we can help you improve your ad performance by reaching out here.


Good stuff for running shopping ads with strategy level on Google merchant. Easy to read and conveyed more