It’s time to get tracking.
With Universal Analytics data officially shut off for good, Google Analytics 4 is now the name of the game for many business owners and website managers.
Unfortunately, setting up GA4 correctly and accurately is much harder (and much more time-consuming!) than Google’s guides make it out to be – especially when it comes to all of the custom events needed to track your business’s unique metrics and performance goals.
Many businesses who take a DIY approach to their GA4 accounts quickly find themselves overwhelmed and utterly confused with all of the custom configurations needed, having spent hours down the rabbithole of help articles with no clear answers to their questions.
Fortunately, Inflow is here to help.
Over the last few years, our analytics team has transitioned more than 50 eCommerce and non-eCommerce clients from UA to GA4. Along the way, we’ve learned some tips and tricks for a smooth migration that captures everything a business needs to bring from Universal Analytics (including the most common errors to watch out for!).
In today’s guide, we’re sharing that process with you, as well as a helpful GA4 eCommerce Tracking Toolkit to help you cover your bases.
Read through it now to start configuring your own accounts — or, if you want an expert to handle your Google Analytics 4 setup for you, reach out to our team anytime to get started.
And, if you ever need help with your Google Analytics 4 setup, Inflow is always here to help. Contact us today for an account audit, customized training sessions, or other GA4 services to meet your team’s needs.
Table of Contents
- How GA4 Tracking Differs from UA
- How to Set Up Google Analytics 4: The Basics
- How to Set Up Google Analytics 4 Tracking
How Google Analytics 4 Tracking Differs From Universal Analytics
Before we get into the details of setting up Google Analytics 4 tracking, you need to understand the crucial differences between this platform and Universal Analytics.
GA4 is more than just an “upgraded” version of UA. It’s a completely redesigned system with a totally different approach to event and conversion tracking.
Whereas UA tracked events as different “hit” types (page views, events, transactions, etc.), Google Analytics 4 tracks them all as an “event” — which means you’ll need to do some additional configuration for the most accurate data collection.
Some common examples from our client work:
- Setting up additional parameters for your events
- Changing default settings like reporting identity to fit your business needs
- Customizing reports to display the metrics and data most valuable for your team
In other words, you can’t just expect to copy-paste your UA properties into GA4 and go along with your day. Google Analytics is much more complicated than its previous iterations, and you’ll need a thorough understanding of the platform before you start setting up your data tracking and reporting within it.
You can learn more about how GA4 differs from UA in Google’s complete guide, or you can check out our infographic below for the quick hits:
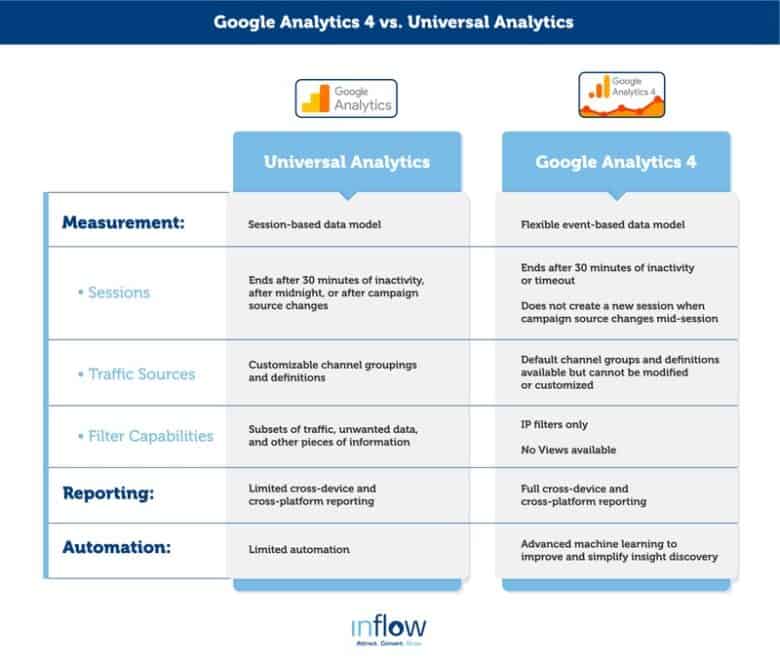
If you haven’t yet read our introduction to the new Google Analytics 4, we recommend you do so now, to familiarize yourself with the platform. You can also watch our explanatory video below:
The video below is hosted on YouTube. If you need assistance with viewing the video, please contact info@goinflow.com.
How to Set Up Google Analytics 4: The Basics
Before setting up your data tracking, you must first configure your Google Analytics 4 property.
If you haven’t yet done so, follow the steps below to get started. (You can also use Google’s Setup Assistant within the platform for a hands-on tutorial.)
Step 1: Create Your New GA4 Property.
The first step to your GA4 tracking — make sure you have a property to track with!
Note: Before the GA4 switchover in summer 2023, Google auto-migrated many Universal Analytics properties into GA4. Unfortunately, these auto-migrated properties covered only the basics, leaving many businesses without the crucial tracking they needed.
If you choose to keep your auto-migrated property, we recommend setting up additional events to capture that data that you’re missing. Not sure when to keep your auto-migrated account and when to start over? Chat with our team today.
If you need to recreate your Google Analytics property, you can easily do so with the steps below.
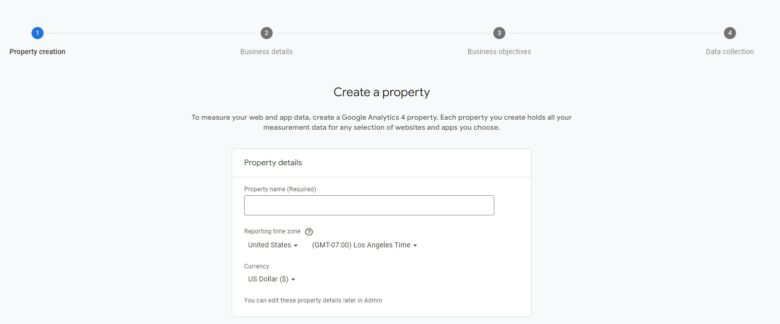
After hitting “Create Property,” follow these steps to complete the process.
- Click on “Property Settings” in the lefthand navigation menu.
- Fill out the details for the Property as accurately as possible.
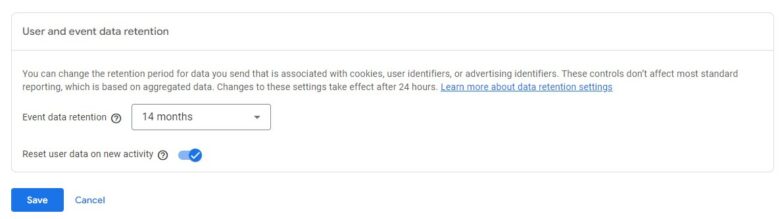
Once you create your GA4 property, you’ll need to make some decisions regarding your data collection processes and your Google Signals settings.
By default, GA4 properties are set to retain data for two months. You can change that to up to 14 months on free accounts, which we usually recommend for our clients.
Google Signals allows you to associate session data with Google account users to better inform your cross-device reporting, remarketing, and the like. Turning this feature on or off should be an internal business decision, as Google Signals may be impacted by privacy laws within your country.
The video below is hosted on YouTube. If you need assistance with viewing the video, please contact info@goinflow.com.
At this point, you’ll have your basic property setup and populated with the must-have info. But there are a few other steps involved before you can configure your tracking and start capturing your data.
Step 2: Set Up and Connect BigQuery Data Warehouse.
While not all of Google Analytics 4 is limited to a 14-month data retention period, it’s still a good idea to set up a data streaming warehouse to store your long-term historical data.
This way, you’ll have the most “raw” or complete set of your analytics data — and you’ll actually own your data once it hits the data warehouse (which can be incredibly useful for granular data needs like conversion rate testing).
Here at Inflow, we’ve been using BigQuery for our clients, because GA4 provides an easy connection to the platform. It’s also free or very low-cost for many of our mid-sized clients’ needs, with 10 GB of complimentary storage.
Before you can link this data stream to your Google Analytics 4 account, you’ll need to set up a project for your site. Follow Google’s guide to doing so, then link this warehouse to your GA4 property as outlined below:
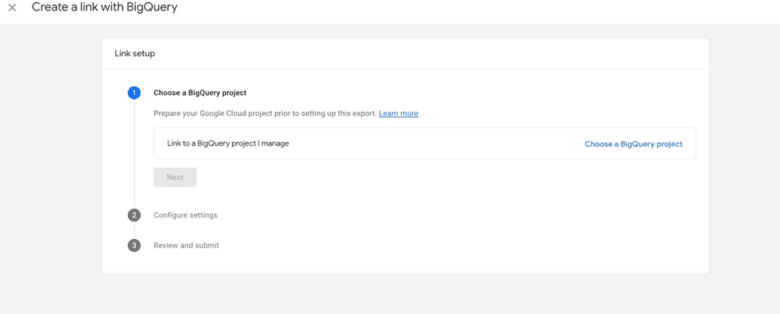
- In Setup Assistant, click on “Link BigQuery” in the “Linking” section.
- Click the blue “Link” button.
- Click “Choose a BigQuery Project.” (You may need to search for the Project ID if you don’t see it listed.)
- Select the appropriate BigQuery project and then click “Confirm.”
- Select the data location (your GA4 property name).
- Select the data streams and frequency. We recommend leaving your frequency set at “Daily.”
- Finally, click to the next step, where you can review and submit your data. You will now be able to see your Google account in the BigQuery Linking page.
Step 3: Link Your Existing Accounts.
In addition to linking BigQuery, you’ll also need to link your Google Ads accounts. This will allow your business to take advantage of GA4’s advanced cross-platform data integration and reporting capabilities, including its compelling Predictive Audiences feature.
Note: In order to properly use GA4 data in your ads, you’ll need to take some additional steps within the Google Ads platform itself. We won’t cover that in this post, but you can read more here.
The video below is hosted on YouTube. If you need assistance with viewing the video, please contact info@goinflow.com.
There are two processes involved in linking your GA4 to your Google Ads accounts:
Google Ads
- In Setup Assistant, click on “Link Google Ads” in the “Linking” section.
- Click the blue “Link” button.
- Click “Choose Google Ads Accounts.”
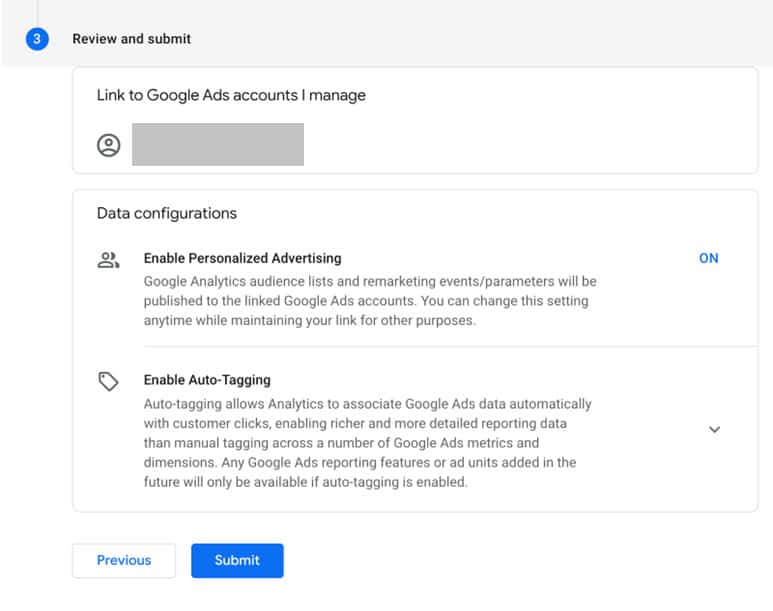
- Select your account and click “Confirm.”
- Click on “Enable Auto-tagging.” Select “Leave my auto-tagging settings as they are.”
- Click “Next” and then “Review your settings.” Hit “Submit” to finish the process.
Google Merchant Center
If you’re using Google Ads for your eCommerce business, odds are you’re also using Google Shopping.
To ensure your GA4 data gets integrated into your Google Merchant Center, you’ll need to link GMC to your new property with the following steps:
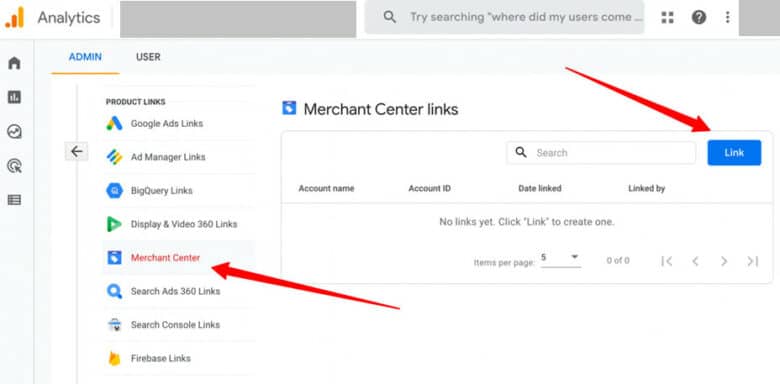
- In Google Analytics, click “Admin.”
- In the “Account” column, make sure that your desired account is selected. (If you only have one Google Analytics account, it will already be selected.)
- In the “Property” column, select the property you want to link to Merchant Center.
- In the “Property” column, under “Product Links,” click “Google Merchant Center Links.”
- Click the blue “Link” button.
- Click “Choose Account,” and then select the account you want to link your property to.
- Click “Confirm.”
- Click “Next.”
- Under “Enable Auto-tagging,” choose to enable auto-tagging for the Merchant Center account (or leave the settings as they are).
- Click “Next,” and then review and submit your configuration settings.
How to Set Up Google Analytics 4 Tracking
Now that you’ve completed the first part of the GA4 setup process, it’s time to get into the nitty gritty of conversion tracking.
Remember, Google Analytics 4 tracks events very differently from Universal Analytics. You can’t just import your UA setup into your tracking configuration; you’ll need to go through the following steps to properly configure your events tracking and ensure your analytics data is collecting accurately.
The video below is hosted on YouTube. If you need assistance with viewing the video, please contact info@goinflow.com.
In the section below, we’ve simplified the tracking process by offering a GA4 eCommerce Tracking Toolkit that your development team can upload quickly to your site.
For a full description of the process without these tools, check out Google’s guide.
Step 1: Add a GTM Container to Your Site.
To get your Google Analytics 4 tracking to fire, you’ll need to use Google Tag Manager to add a custom tag to your all pages on your site.
Fortunately, we’ve got you covered with our downloadable GTM container. It contains every piece of tracking code you need to start recording events on your eCommerce site. You can simply download it, import it, and configure it in a few steps.
You’ll find your unique measurement ID in Google Analytics 4. In Setup Assistant, navigate to “Tag Installation,” click on your web data stream, and then locate your ID in the upper-right corner of the page.
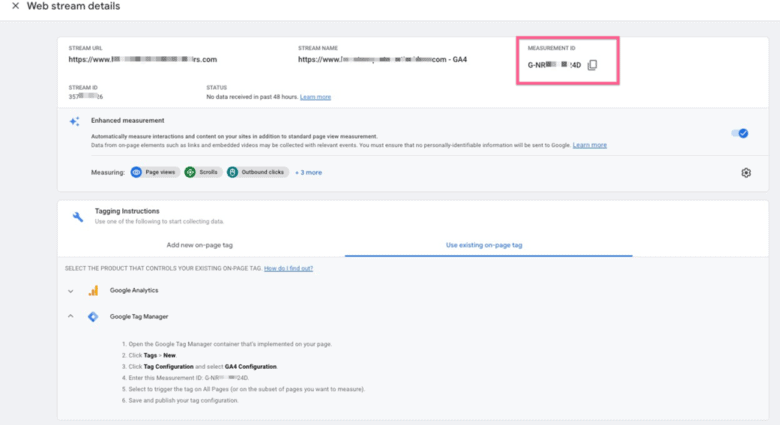
Add this measurement ID to our GTM container. You’ll also need to add this ID to your GA4 configuration tag.
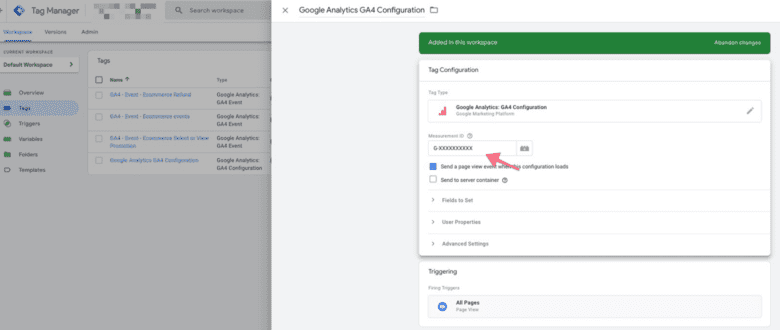
Then, the container and global site tag will be ready for installation on your website.
If your Google Tag Manager account organization leaves much to be desired, we’re happy to conduct a GTM audit to clean up and streamline your tags and code. Contact us today to learn more.
Step 2: Set up non-eCommerce Conversion Tracking.
From a non-eCommerce perspective, setting up conversion tracking in Google Analytics 4 can be fairly straightforward.
We recommend identifying any applicable events and conversions in your Universal Analytics properties (again, saving eCommerce events for the next step) and making a list of those you feel comfortable replicating in Google Analytics 4 — such as email subscription sign-ups, contact form fills, etc.
Make sure to ignore events that are now automatically tracked, including scrolling, outbound clicks, and more.
Once you’ve identified the metrics you need to track, you’ll want to set these up in Google Tag Manager using the Google Analytics 4 Event Tag type.
Don’t forget to mark these events as “conversions” in the Google Analytics 4 interface when you’re done, if any of these custom events qualify as conversions.
The video below is hosted on YouTube. If you need assistance with viewing the video, please contact info@goinflow.com.
Learn more about this kind of event tracking setup in Google’s detailed guide.
Step 3: Set Up eCommerce Tracking.
If your site is eCommerce, you’ll need custom tracking to collect data for all of your eCommerce site events. Fortunately, when you use our GTM container, this step becomes much simpler for your development team.
In essence, all they’ll need to do is code the GA4 dataLayer into your website. This dataLayer communicates to Google Tag Manager what eCommerce-related events are happening on the site. (This includes actions like purchases, add-to-carts, refunds, etc.)
Adding the dataLayer code should be fairly straightforward for most eCommerce platforms. Our development partners typically report 5–10 hours of work needed to complete it.
If you’re using a platform like Shopify, WooCommerce, BigCommerce, or Magento, you might consider using an app or extension to install the GA4 dataLayer on your site, instead.
(Note: Many of these platforms now have native integrations with Google Analytics 4. However, there are still pros and cons to using these integrations rather than extensions or manually adding the dataLayer into your site.)
Download Our GA4 eCommerce
Tracking Toolkit Now.
Set Up Your GA4 Tracking Today for More Data Tomorrow
The time for procrastinating your GA4 account setup has come and gone. Now, every day that you go without proper Google Analytics 4 tracking is another day you’re missing out on crucial data needed to inform your marketing and business strategies.
As we enter 2024, it’s not only important to have a properly configured GA4 account but also the knowledge and understanding of how to use and analyze your data moving forward.
As mentioned above, GA4 Setup Assistant is a great place to start, as is our GA4 eCommerce Tracking Toolkit. However, these guides only scratch the surface of what’s required to make the most of Google Analytics 4.
There are plenty of other settings and features — like referral exclusions, managing automatic event detection, cross-domain tracking, filters, etc. — that we haven’t covered in this guide but are crucial to harnessing the full power of GA4.
In short, without the detailed, personalized configuration instructions from an experienced analytics professional, you’ll be leaving valuable data on the table.
If your GA4 configuration or education has some wide gaps, our team is here to help. We are proud to offer a wealth of services to get your team up to speed, including:
- GA4 account setup and tracking
- GTM and GA4 audits of existing accounts
- Customized training sessions on GA4’s capabilities and user interface
- And much more
In the meantime, you can download our GA4 eCommerce Tracking Toolkit to start configuring your account basics and our Google Analytics Comparison Dashboard to analyze your new data as it starts trickling in.

You can also review our other helpful guides on Google Analytics 4 below.


0 Comments