It’s easy to get tunnel vision when you’re looking at a Google Ads (formerly AdWords) account that you’ve been running for a while — or that’s been run for you by a third-party PPC marketing agency.
Many digital marketing teams fall into the trap of doing things “the way they’ve always done,” even if that’s at the expense of sales and revenue growth. Common errors are overlooked, optimizations are forgotten, and experimentation can fall by the wayside when risks aren’t taken.
The good news: All of this can be avoided with regular Google Ads audits.
A detailed pay-per-click advertising (PPC) audit can identify wasted spend and new opportunities — all of which can help you streamline your Google Ads strategy and better manage your account.
And today, we’ll tell you how to do it.
Keep reading to learn the nine crucial steps our agency team follows for every new client, and replicate them for your accounts today to start improving your return on ad spend (ROAS).
Looking for a free Google Ads audit from an expert agency? Inflow will happily review accounts from qualified brands.
Reach out to our team to request a comprehensive account audit and strategy proposal now.
Table of Contents
- What is a Google Ads Audit?
- How to Audit a Google Ads Account
- Confirm your tracking is accurate and firing.
- Look for missing account and campaign information.
- Review and/or incorporate GA4 audiences.
- Review branded search campaigns.
- Evaluate your general search terms and location targeting.
- Review performance by channel and device.
- Optimize your product data feed.
- Revisit your bidding strategy.
- See how you compare to the competition.
What is a Google Ads Audit?
A Google Ads audit is the first step toward improving your PPC performance. After all, you have to know where you are before you can get to where you want to go.
Like with all digital marketing audits, you can get as detailed as you want with your PPC audit. You may be limited by time and/or funds, and that’s okay — but remember that the information (and therefore the results) you get will be directly related to the extent of your research and analysis.
At the bare minimum, your Google Ads audit should review:
- Your Google Search Ads campaigns
- Your Google Shopping Ads campaigns
- Branded campaigns vs. non-branded campaigns
- Performance by device
- Bidding strategies
- Ad and campaign extensions
- Negative keyword lists and location targeting
- Ad copy in Responsive Search Ads (RSAs) and PMax asset groups
- And competitor research
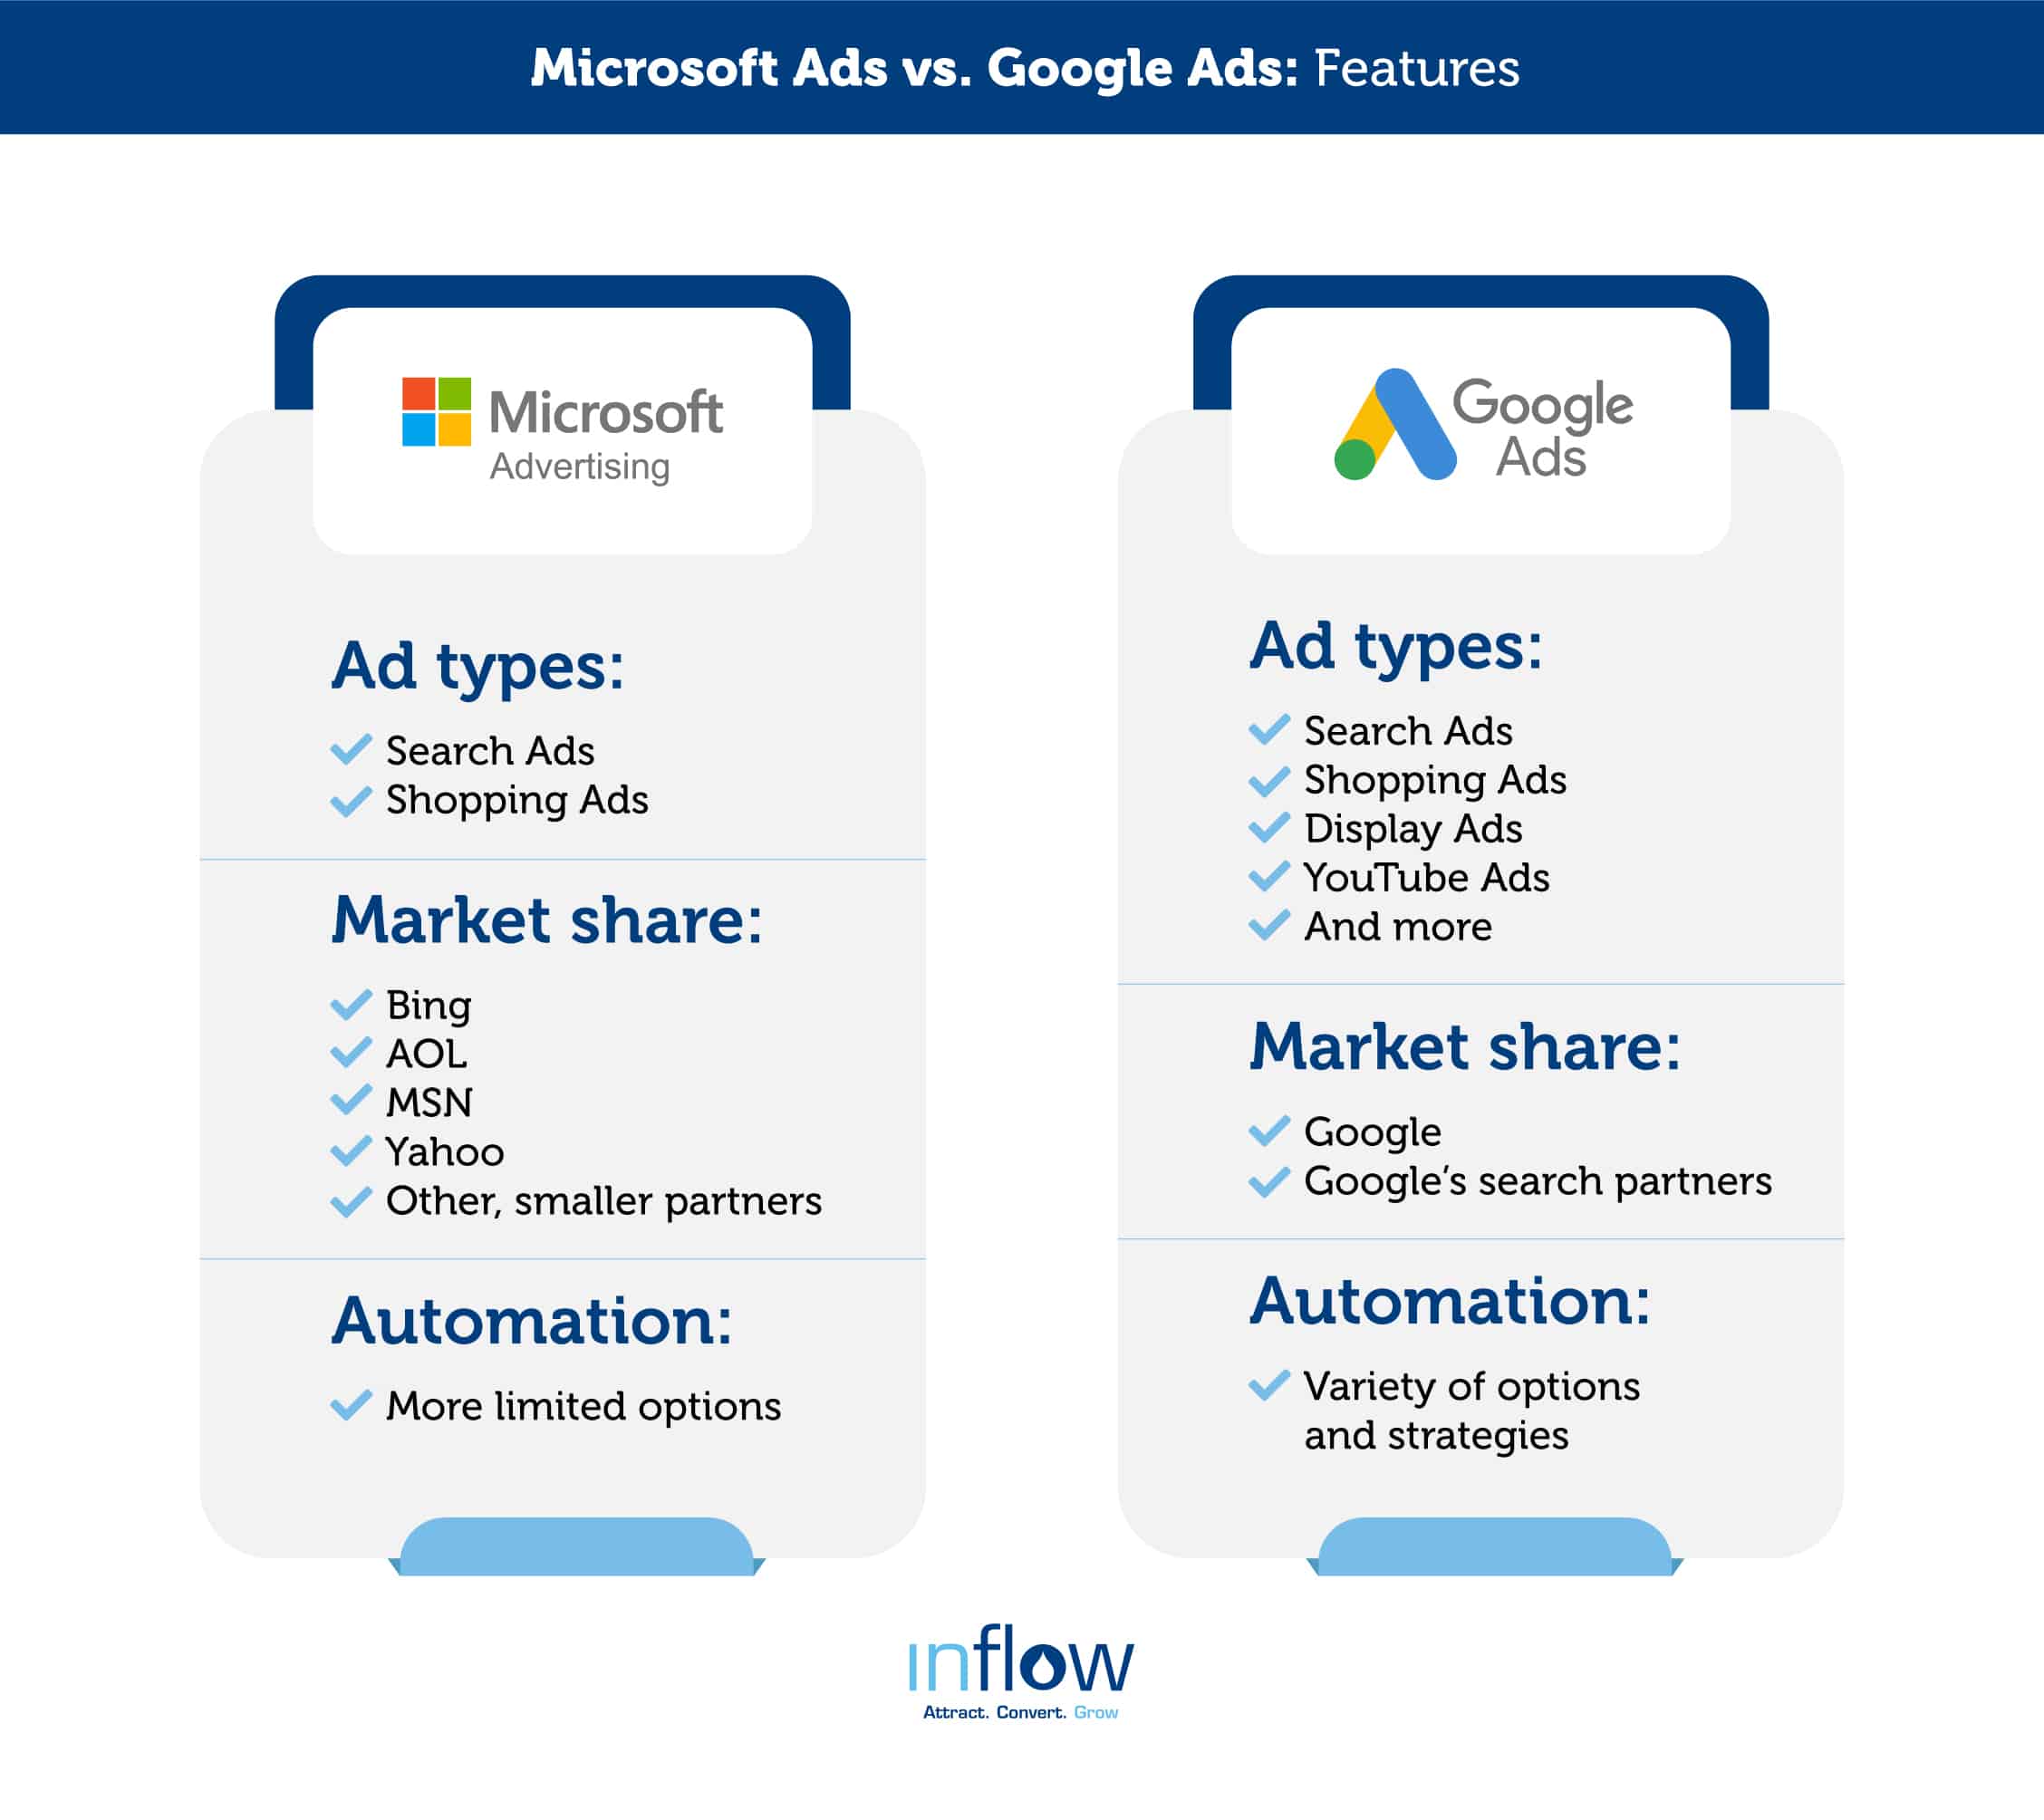
Note: While there are many similarities between Google and Microsoft Ads, we’ll focus solely on the former in this guide. While Bing Ads has grown over the last decade, Google remains the primary driver of modern advertising and conversions for many industries. Once you get your strategy dialed in on Google, you can take those learnings over to Bing for added benefits.
Why It Matters: The Real-Life Example
We audit a lot of Google Ads accounts, both those managed by other digital marketing agencies and those managed by in-house specialists. Along the way, we’ve uncovered opportunities — big and small — that have made major differences in long-running PPC campaigns.
Take, for example, Atrantil.
Just one month after completing a Google Ads audit and improving the account’s setup, this client saw:
- 116% increase in branded impression share
- 52% decrease in cost per click (CPC)
- 66% increase in clicks
- 36% increase in ROAS
The video below is hosted on YouTube. If you need assistance with viewing the video, please contact info@goinflow.com.
If you’re a company whose revenue and growth rely on SEO and SEM, conducting regular audits is crucial. By scheduling out frequent account audits, you’ll be sure you’re spending your money efficiently and that your ads continue to work with each new algorithmic update, change in trends, or buying season.
How to Audit a Google Ads Account
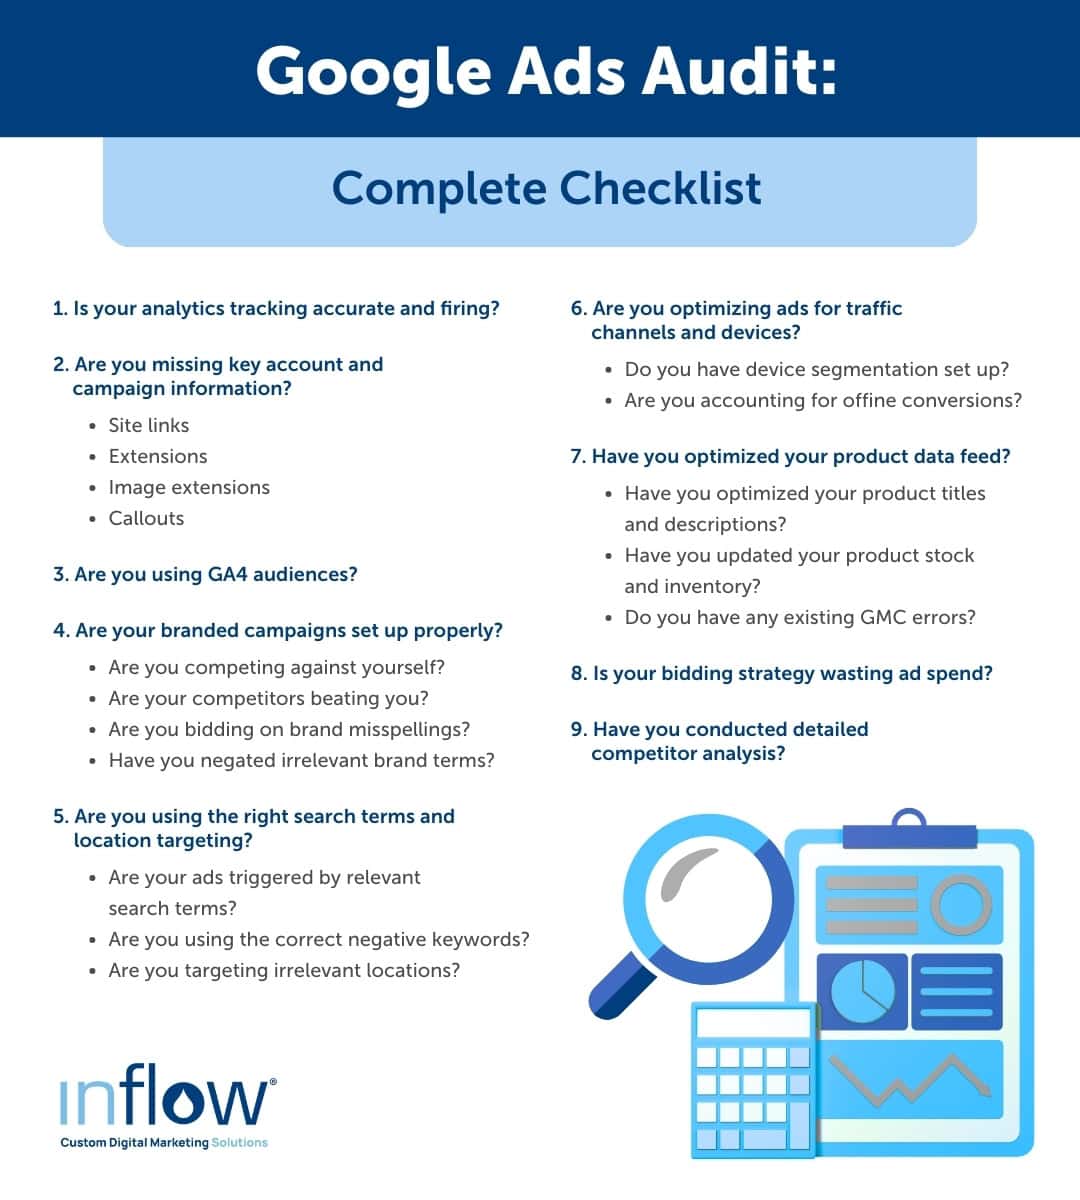
Here at Inflow, we conduct PPC audits for every new client we bring on board. In the step-by-step template below, we’ll detail both the basics and the more advanced techniques involved.
This Google Ads audit checklist is a great starting point for evaluating your own brand’s account structure and campaign settings.
However, if you’re looking for a more detailed audit by experts who know exactly what to search for, our team is always happy to help. You can request a free proposal anytime to begin your professional audit.
In the meantime, follow the Google Ads account audit checklist below to begin your DIY journey.
Step 1: Confirm your tracking is accurate and firing.
Before you can start analyzing your data, you need to make sure that it’s tracking correctly.
And believe us: Analytics errors are more common than you think.
For example, upon onboarding a new client right before Black Friday, we quickly found that their previous agency had been double-counting conversion rate and revenue for nearly four years! For a company spending six figures on Google Ads every month, this was a huge error — and made prepping for the busy holiday season much more difficult.
That’s why we recommend auditing your analytics setup before doing anything else.
First, make sure that your Google Ads account is connected to your Google Analytics 4 accounts. Then, review your conversion tracking (critically important with the updated GA4 system) to check for double-tracking or missing data.
The video below is hosted on YouTube. If you need assistance with viewing the video, please contact info@goinflow.com.
You can also perform test orders to review your tracking setup. By intentionally clicking on your own ad and placing an order, you can compare how that order tracks in Google Analytics and Google Ads.
Depending on what you sell, a high “repeat rate” metric can be a red flag for double-counting conversions.
Sometimes, identifying these errors requires a fresh set of eyes on your account. That’s why we recommend hiring a third-party professional (like a contractor or agency) to review your setup and find the errors your team may be overlooking.
Step 2: Look for missing account and campaign information.
In addition to reviewing your analytics setup, we recommend conducting a top-level review of your campaigns and ad sets, too.
Fortunately, Google Ads is pretty thorough in telling you which information is needed and which tasks must be accomplished for a proper account setup. Start by using the platform’s guides to review your current account configuration, and then make a list of everything that is missing or needs improvements within your campaigns and ads, such as:
- Site links
- Account and ad extensions (including price and phone call extensions)
- Image extensions
- Callouts
- Structured snippets
- Business names and logos
- And more
You should have extensions for all of your campaigns to give yourself the best chance to run effective ads. Without them, your ads typically won’t get the best placement, and you’ll end up paying more overall for a lower ad rank.

Keep note of which extensions are missing and which extensions exist only at the account level. In most cases, campaign-specific and even ad-group-specific extensions will be preferable to an account-level extension. (Note that some extensions are only available for specific campaign types, and most are not available for Shopping or display campaigns.)
Account-level extensions are typically the lowest-hanging fruit in a Google Ads audit — that is, they’re the easiest problem to fix. Whether or not you address them right away is up to you.
We recommend first creating a comprehensive list and then prioritizing your improvements based on your team’s bandwidth and the biggest opportunities.
Step 3: Review and/or incorporate GA4 audiences.
Since the sunsetting of Universal Analytics in 2023, associated UA audiences are no longer useful in Google Ads. However, many accounts are still using them.
For the most comprehensive audience views, make sure that you’re using new audience sets from Google Analytics 4.
Once you’ve linked your GA4 account to your Google Ads (as discussed above), you can either recreate your UA audiences in GA4, or use the platform’s predictive capabilities to auto-generate audiences, including:
- Likely 7-day churning purchasers
- Likely 7-day churning users
- Likely 7-day purchasers
- Likely first-time 7-day purchasers
- Predicted 28-day top spenders
The video below is hosted on YouTube. If you need assistance with viewing the video, please contact info@goinflow.com.
You can also create your own target audiences using the Audience Builder tool.
Step 4: Review branded search campaigns.
Once you have the basics covered, it’s time to review your most valuable Google Ads efforts — your brand campaigns.
Branded keywords are where your paid search and SEO strategies come together. While your search engine optimization strategy will tackle the organic side of the SERPs, your branded PPC efforts will keep your site in the paid results with strategic bidding.
In other words, branded search campaigns are often a high-intent and low-cost part of your overall Google Ads strategy.
Unfortunately, if you’re not paying attention to your bids, it’s easy for your competitors to win out on your branded searches. If that happens, you’ll lose out on customers who conduct search queries for your brand — but end up clicking on your competitors’ ads instead!
To audit your branded campaigns, follow these steps:
1. Check if you’re competing against yourself.
Identify which duplicated search terms are targeting your branded and general campaigns by reviewing your Search Terms Report. If certain terms are triggering both types of campaigns, you’re hurting your results for both and raising your overall bid price.
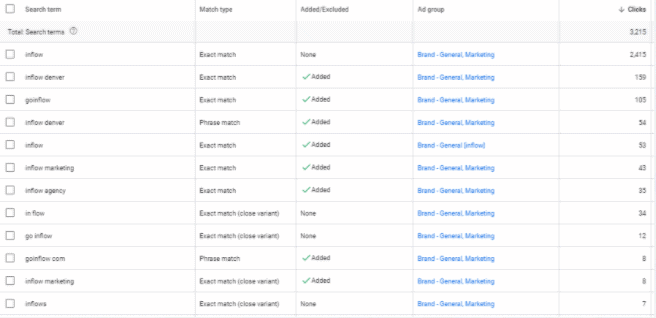
Use negative keywords in the appropriate campaigns to clean up your bidding and eliminate that wasted spend.
2. Check if competitors are beating you.
Use Google’s Auction Insights to see which competitors are also showing up for your branded keywords. Review those brands with a high impression share and overlap rate, and create a plan for upping your bids and beating them in the results.
Follow our guide to Google Ads competitor research to get started.
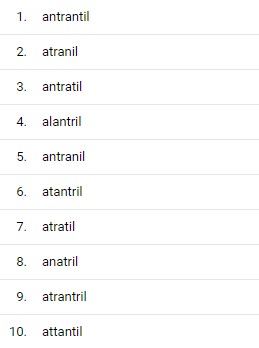
3. Make sure you’re bidding on brand misspellings.
Most new Google Ads marketers know to bid on their brand terms — but many forget to include misspellings in those bids, too.
Whether your brand name is difficult to spell (like Atrantil’s) or not, make sure that you’re including any relevant misspellings in your campaigns to capture as wide a potential audience as possible.
4. Negate irrelevant brand terms.
For a deeper dive, go beyond your general branded terms. Audit your search terms and look for queries like “owner,” “stock price,” “customer service phone number,” and more.
These searches indicate that someone is already interested in or a customer of your business, so it’s not often worth paying for them to click on your ad.
Because these are low-intent terms, we recommend negating them to avoid wasted spend.
Step 5: Evaluate your general search terms and location targeting.
After you’ve reviewed your branded search campaigns, it’s time to review your more general search campaigns for effectiveness, particularly in keywords and targeting.
1. Review your search terms and triggered ads.
Once again, you’ll need to study your Search Terms Report and look at which keywords are triggering which ads. (Do this by adding separate columns into your report.)
Once you have this information, ask yourself the following questions to reveal how your general search term campaigns are impacting your overall goals:
- Are the match types effective? Are they actually getting the search terms you want?
- Do you need to pause any of your phrase match or broad match keywords?
- What terms do you need to include on your negative keyword list?
For example, when it came to an eCommerce client that sells high-quality meat, we consistently bid on terms like “ribeye steak.” However, with that general term came queries like “most expensive ribeye steak” or “ribeye steak images.”
While these technically were terms we were “bidding” on, they had no business in our auction. We made the appropriate adjustments — which leads us to the next item in our audit checklist.
2. Review your negative keyword list.
Don’t forget to double-check your campaign negatives and your negative keyword list.
Make sure your negatives are set up properly for the appropriate ad group level, campaign level, and account level. This helps ensure the most relevant ads are being shown for various searches, saving you wasted money on irrelevant search terms that won’t bring in any business.
For example, if you sell mattresses, make sure your campaigns aren’t triggered by generic keywords like “sleep” and “pillows.” Instead, focus your bids on those high-intent search terms (like “best mattresses”) to maximize your ROAS. Leave the more generic terms to those competitors with a larger budget to waste.
To go even deeper, you can create negative keyword lists for competitors, locations, competitor misspellings, or spellings that are too close to another brand name.
3. Review your negative location targeting.
Don’t forget to double-check your campaign location negatives, as well. For example, if you only sell a product in the U.S., you may be inadvertently wasting spend for users located outside of your service areas.
Use your Google Analytics account to review your traffic acquisition from all sources. Segment by country and download this list.
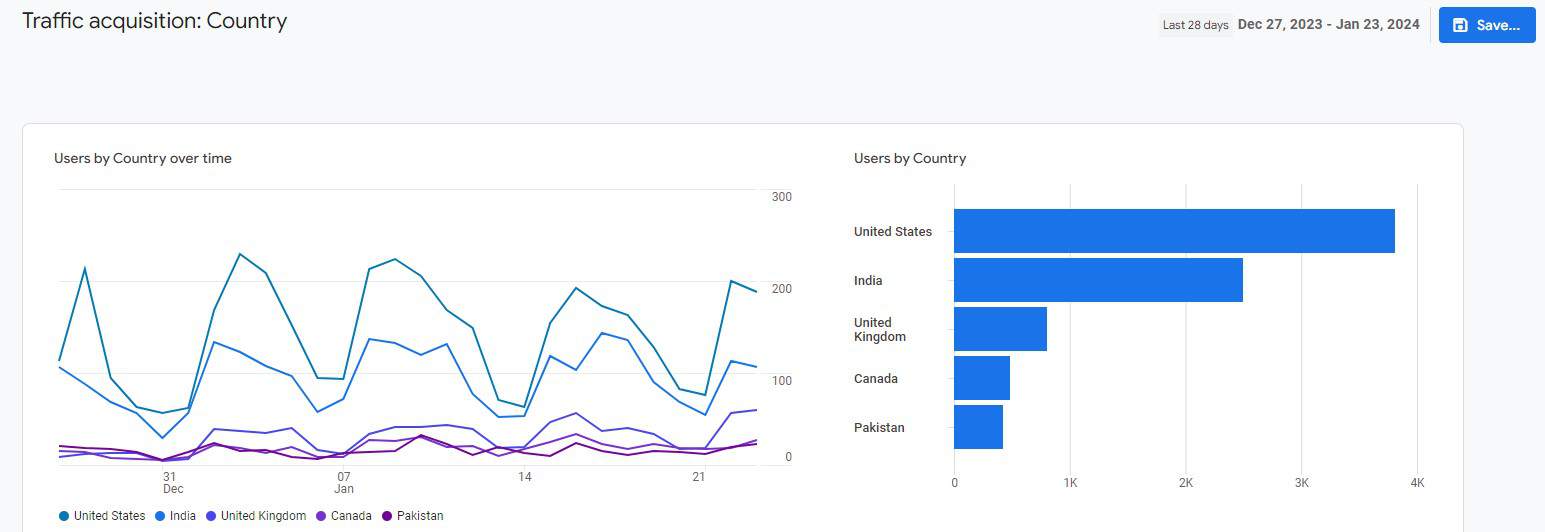
Once you have an export of all visitors coming to your site and the countries they originate from, pull out any irrelevant countries and add them in bulk to your campaigns’ negative location targeting.
Step 6: Review performance by channel and device.
Many of our clients use multiple channels to market their products and services. But audiences from different devices and channels behave differently, which means you need to understand which conversions are coming from which source to fully optimize your Google Ads strategy.
Here’s what we recommend:
1. Check your device segmentation.
Which type of conversion you prioritize with your paid search efforts will depend on how your customers prefer to buy your products or services. If most of your conversions come from one device over another, prioritize that one for conversions, and use the other for top-of-funnel targeting and information gathering.
For example, if mobile campaigns perform better than desktop, it might be worth segmenting out and giving those ads a higher budget to maximize mobile conversions.
On the other hand, if you sell products that require more customization before a final purchase, customers may find that hard to do on their mobile devices. Instead, they may choose to complete their purchase on desktops, which means you’ll need to prioritize those campaigns and resulting conversions.
You can easily review your device performance in GA4. In “Reports”, click on the “Tech” dropdown menu. You’ll get a high-level view of device metrics on the “Overview” tab; you can also drill down deeper by clicking on “Tech Details.”
To get the most data, start by clicking on “Tech Details” and update the default report to show “Device Category.” Add in a secondary dimension like “Session source / medium” and then add a filter for “CPC.”
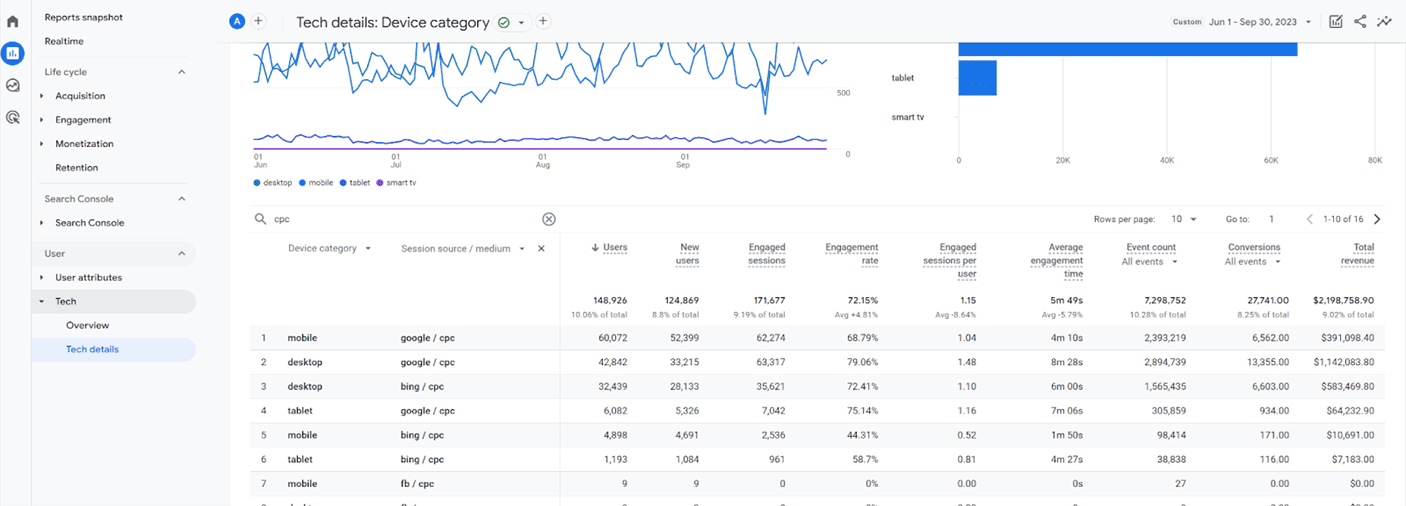
Keep in mind that most eCommerce purchases involve eight to 11 touchpoints at various stages in a customer’s journey.
For example, several of our clients sell high-end electronics and home furnishings that include a long buying journey. Usually, product discovery and research are performed on the phone, while the final purchase is made on a desktop computer.
To keep people coming back and purchasing on the desktop at a later date, we have to continually drive traffic by bidding on organic, direct, and email channels.
Bottom line: Don’t just rely on the numbers you see in Google Ads. Understand how your mobile traffic comes back to your site to drive the best results.
2. Don’t forget about offline conversions.
Not all customers will make a purchase right after clicking on your ad in the SERPs. Sometimes, they’ll take a multi-channel journey during their research. Other times, they’ll complete their purchase through an offline method, like calling your customer service line.
For example, one of our wholesale clients uses online stores, brick-and-mortar stores, and call centers to reach various subsets of customers and make sales. While they knew that 80% of their sales were finalized through their call center, they didn’t know which marketing channels were contributing to those purchases, making any campaign optimizations incredibly difficult.
By adding a click ID to their PPC ads, we were able to segment their conversions by original source, in turn further optimizing their ad spend based on high-return, low-return, online, and call center — resulting in a 74% increase in Google Ads revenue.
Similarly, some of our lead-generation clients see much higher rates of call-in sales that originate from paid search results (think lawyers and real estate companies). While these clients aren’t selling a product online, their audience is finding them through those Google searches they conduct on their phones.
In this case, you’ll need to combine your channel and device data for the fullest picture of your campaign results — and use that to optimize your strategy.
Step 7: Optimize your product data feed.
A lot of eCommerce brands overlook their Google Merchant Center product data feed. But, by focusing solely on ad copy and keywords, they’re missing out on the most important component of an eCommerce PPC strategy — Google Shopping Ads.
Whatever product your eCommerce company sells, make sure that you’re accurately advertising it in your GMC product feed by following these steps:
1. Optimize your product titles and descriptions.
The information you include in your product titles or descriptions is how Google triggers appearances in the search results. This means you’ll need to provide accurate, detailed-but-not-too-detailed information about your products, and update it frequently for the best results.
There’s a bit of an art to titling products and to writing product descriptions.
Product titles should use high-intent search terms and key selling points in a way that still sounds natural. If titles and descriptions are subpar, you’ll miss out on key appearances in the search results and fail to convince shoppers to purchase your product.
With product descriptions, you want to strike a balance between offering a good user experience with detailed (but not keyword-stuffed) content. Don’t use overly creative or artsy descriptions, because Google won’t understand the nuance.
Save the commentary for your blogs and keep your product listings straightforward and to the point.
As you’re rewriting this copy, confirm that every listing has the following information:
- Product title
- Description
- GTIN (Global Trade Item Number)
- Product category
If anything is missing, make sure to add it.
You should also review current search results to identify best practices for this information.
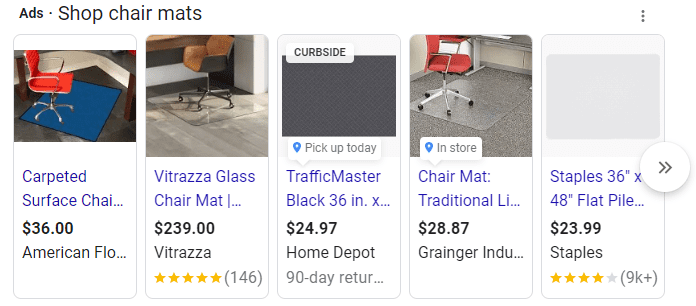
Look at your own products on Google Shopping, and then look at your competitors’. See which information is readily displayed in the SERPs, and optimize your own product information for those.
For example, while you may have 300 characters for descriptions and 150 characters for your titles, the first 20–30 characters are the most important — because they are what your shoppers will see first.
2. Update product stock and inventory.
In the age of uncertain product supply lines, make sure you’re continuously updating out-of-stock products to avoid wasted spend. While Merchant Center will automatically pull inventory numbers from your site, your Google Search Ads campaigns will continue to run if you don’t pause them for out-of-stock products.
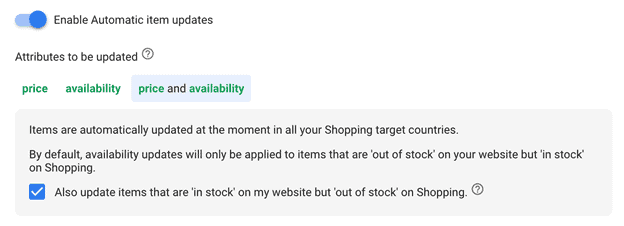
To minimize any lost revenue from advertising out-of-stock products, you can also offer a backorder/preorder option for your customers or direct them to similar products.
If you won’t be adding the product back to the lineup for a while, it may be worthwhile to pause those ads.
3. Address any existing GMC errors.
Google Merchant Center does a great job of telling you exactly which issues are present with your ads.
It will tell you which products aren’t serving at all and which are serving in a limited capacity, and it will also tell you why. (Perhaps the landing page isn’t working or the listing is missing key product information.)
If you have any existing GMC errors, be sure to address them during your Google Ads audit. Then, make a plan to address any that may arise in the future quickly and efficiently.
Step 8: Revisit your bidding strategy.
Bidding strategy is crucial to the success of your Google Ads campaigns. However, it usually takes some trial and error to discover what works best for your brand.
The two biggest factors in nailing down an effective bidding strategy are patience and a willingness to make micro-adjustments along the way based on the results you’re seeing in real-time.
While you’re auditing your Google Ads accounts, look for these common mistakes:
- Trusting all of your bid adjustments to Google’s automatic bidding capabilities
- Overlooking time-of-day optimization, which causes wasted budget
- Forgetting to bid on your competitors’ branded queries
For most brands, we recommend a balance between manual and automatic bidding. The exact ratio for your business will depend on your unique goals. Ultimately, it will come down to how much control you want, how much trust you have in Google’s algorithms, and whether you have enough traffic and conversions to effectively use the automated bid strategies.
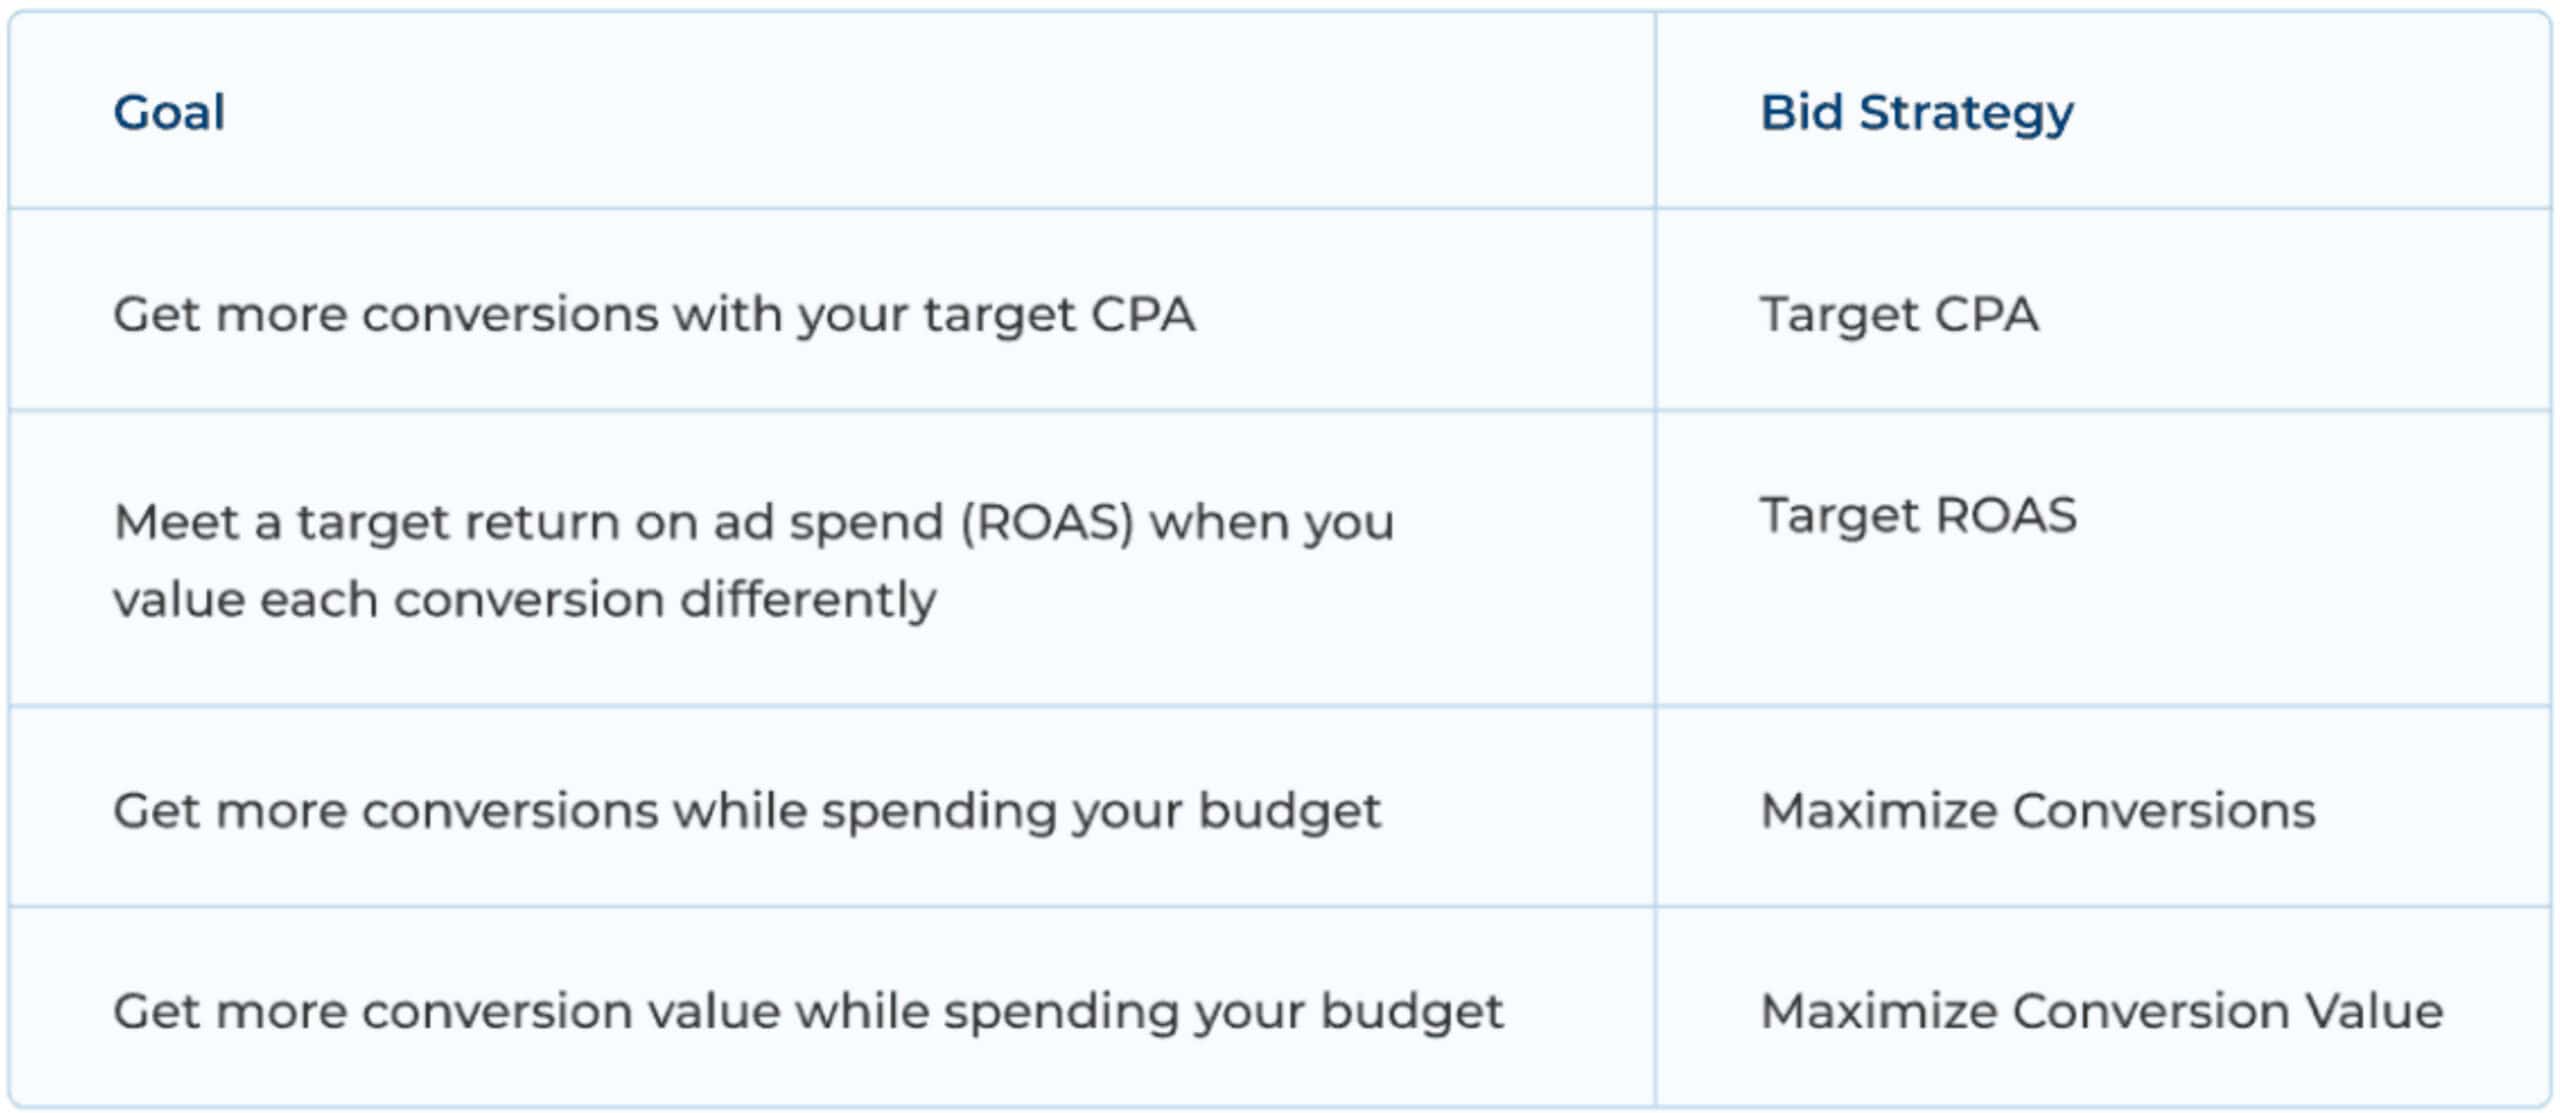
If you’re not sure which strategy is the best for your brand, Google lets you run experiments where you can 50/50 test one bid strategy against another. We recommend testing each for a few weeks, identifying which strategy works better for your company, and adjusting your campaigns based on the results.
Step 9: See how you compare to the competition.
Finally, as you’re auditing your Google Ads campaigns, don’t forget to evaluate your competitors’, as well.
Be mindful of researching your industry as a whole rather than trying to hone in on one specific brand. Because Google no longer gives the detailed information that it used to, competitor research is a bit more difficult. However, we think this broader approach is actually better for most brands — because it helps you focus on the bigger picture rather than the granular details.
Use the following tools to get a lay of the land for your vertical:
- Google Ads Keyword Planner: Shows you which crucial keywords are trending and a general (usually low) estimated bid range required to rank for them
- Google Ads Campaign Target ROAS Simulator: Estimates how your (and your competitors’) current ad spend will affect your conversion goals, including how much extra budget you’ll need to achieve them
- Google Merchant Center’s Best Sellers: Shows the most popular and top-performing products in your industry, which can help you adjust your campaigns and product offerings
Follow our Google Ads competitor research guide for more information.
Begin Your Google Ads Audit Now
So, there you have it: everything you need to start your Google Ads account audit.
As you work through this audit process, you’ll likely find some low-hanging fruit that allows for easy optimizations, as well as some more advanced strategies your team can circle back to later on.
Depending on your brand’s goals, you can go as in-depth as you need to. But, for most marketers, these basic steps will suffice.
We recommend conducting regular audits and implementing regular updates to keep your accounts performing as efficiently as possible. While Google does allow for a lot of automation, its automated optimizations often aren’t going to be as personalized as your unique goals will call for — and we’d advise caution in trusting your entire strategy to its machine learning.
While this guide is a great place to start when auditing and improving your Google Ads performance, sometimes it takes a third-party, expert PPC marketer to see the errors and opportunities that your in-house team has overlooked.
Inflow’s strategists stand ready to help.
Contact us today to request a free review of your Google Ads accounts, actionable insights from our team, and a custom strategy that achieves maximum ROAS for your business.
Get Your Free Proposal Now
In the meantime, explore these additional resources for your DIY Google Ads audit:


0 Comments